HOW CAN WE HELP YOU? Call 1-800-TRY-CHOP

In This Section
CIRRUS VM Service Help Guide
Published on February 4, 2023 · Last updated 7 months 2 weeks ago
Find detailed instructions on CIRRUS Virtual Machine (VM) Services.
Service: Request for Adding a Research CostCenter Activity for the purpose of Provisioning Virtual Machine(s).
Requisites: Research CostCenter and Activity.
Step 1
Connect to https://www.research.chop.edu/applications/cirrus and click "Cirrus Log In"

Step 2
At the Login prompt, enter your CHOP username, click "Remember this setting" and Click "Next"

Step 3
Enter your CHOP Password and Click the "Sign in" button

Step 4
Click on Catalog tab (It should be the default when first log in), also you are able to see any virtual machines resources were deployed in our virtualization environment.

Step 5
In the Search for Catalog Items field, type "CostCenter" and Choose "Add CostCenter Activity for VM Provisioning Request"

Or Click to Apply Filter and Select "VM Services" catalog item in the left navigation pane

Step 6
Under the Cost Center Information tab, please search and choose your Cost Center and Grant ID. You can search the field by grant owner or grant number or cost center number

Select grant field going to populate accordingly. Please choose your grant from the drop-down menu

Step 7
Click the next tab "CostCenter Details"

Step 8
Fill the Required field of "CostCenter Group Name" and enter a comment to the CostCenter Approver

Step 9
Click "Submit" to Finish

Service: Request Access to CostCenter Activity for VM Provisioning
Requisites: Cost Center and Activity
Step 1
Connect to https://www.research.chop.edu/applications/cirrus and click "Cirrus Log In"
Step 2
At the Login prompt, enter your CHOP username, click "Remember this setting" and Click "Next"
Step 3
Enter your CHOP Password and Click the "Sign in" button
Step 4
Click on Catalog tab (It should be the default when first log in), also you are able to see any virtual machines resources were deployed in our virtualization environment

Step 5
In the Search for Catalog Items field, type "provisioning" and Choose "Request Access to CostCenter Activity for VM Provisioning"

Or Click to Apply Filter and Select "VM Services" catalog item in the left navigation pane

Step 6
Please Choose the Activity Group
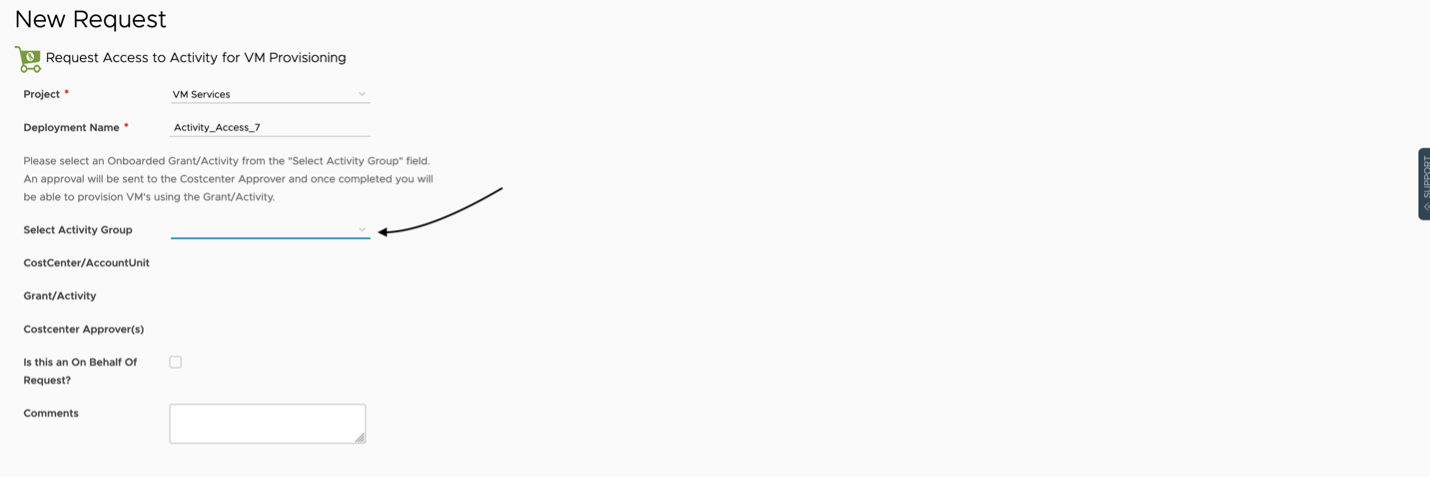

Step 7
You have the choice to either make the request yourself or on behalf of other users.
If this is an On Behalf of Other Users Request, check the box for "On Behalf Of Request" and follow the instructions.

Enter Chop user first name or last name and choose the user from the pop-up menu. If you need to add other users, please click the x icon to remove the name typed and type another user first or last name then choose the new user to add to the list – as per the screenshot below.


Step 8
Click Submit to finish
Service: Request a New Virtual Machine (VM)
Requisites: Cost Center and Activity
Step 1
Connect to https://www.research.chop.edu/applications/cirrus and click "Cirrus Log In"
Step 2
At the Login prompt, enter your CHOP username, click "Remember this setting" and Click "Next"
Step 3
Enter your CHOP Password and Click the "Sign in" button
Step 4
Click on Catalog tab (It should be the default when first log in), also you are able to see any virtual machines resources were deployed in our virtualization environment

Step 5
In the Search for Catalog Items field, type "Virtual Machine" and Choose "Request New Virtual Machine"

Or Click to Apply Filter and Select "VM Services" catalog item in the left navigation pane

Step 6
In the first tab "CostCenter Activity Details", Please select a CostCenter and Activity (Note: All Activities you have added for provisioning or requested access to will be displayed for selection)


Step 7
Please Select the second tab "VM Customization Details"
Select Service level between "Gold" and "Bronze". High level description of Service Level offerings:
Gold - VPLEX Mirrored
- Storage is mirrored across both datacenters. Should either side fail all systems will be recovered to the surviving location.
- Purpose:
- Client systems where significant downtime would impede a department or labs ability to function
- Systems that feed data to clinical or outside systems that could result in safety or financial impact
- Public (Internet) facing web servers
Bronze - No replication
- No replication. Systems placed to balance load and minimize recovery effort in the event of a failure.
- Purpose:
- Test, Dev, and QA systems
- Non-mission critical systems that can wait for recovery until the original system can be restored to service or a DR system brought into service


Select OS Platform flavor "Linux" Or "Windows" and select the version from available versions beneath it


Select CPU and RAM count


If you require Additional Storage, Please check the box for 'Is Additional storage required'


Step 8
Please Select the third tab "VM Profile Details" and Follow the instructions

Enter "Server Name" for the requested Virtual Machine and required description

Select backup Schedule "Daily" or "No Protection" from the list "Select Backup Service" and Select Server Profile "Prod" for production, or "Non Prod" for none production from the list "Select Server Profile"

Step 9
Please select the fourth tab "VM User Access Details"

Enter CHOP user first name or last name and choose the user from the pop-up menu. If you need to add other users, please click the x icon to remove the name typed and type another user first or last name then choose the new user to add to the list – as per the screenshot below. This applies for both "sudo/admin" or "Remote/Access" Users Users depending on the access type


Step 10
Please review the fifth tab for summary and error validation of your choices

Step 11
Click "Submit" to finish
Service: Request access to a Research Virtual Machine
Requisites: Virtual Machine Name
Notes: Approval Process requisite virtual machine owner approval
Step 1
Connect to https://www.research.chop.edu/applications/cirrus and click "Cirrus Log In"
Step 2
At the Login prompt, enter your CHOP username, click "Remember this setting" and Click "Next"
Step 3
Enter your CHOP Password and Click the "Sign in" button
Step 4
Click on Catalog tab (It should be the default when first log in), also you are able to see any virtual machines resources were deployed in our virtualization environment

Step 5
In the Search for Catalog Items field, type "VM" and Choose "Request Access to VM"

Or Click to Apply Filter and Select "VM Services" catalog item in the left navigation pane

Step 6
Under the server selection tab, please use the "Search for VM" field to find a VM if you know the name or leave blank to list all VM's.
NOTE: You can search for VM by VM name, by VM Owner, or by OS type (Windows/Linux). To search by VM Owner, please enter the CHOP user of the Owner


Step 7
Please verify the information about owner, tech contact and description displayed

Step 8
Under the 'Access Details' Tab, you have the choice to either make the request yourself or on behalf of other users.
If this is an On Behalf of Other Users Request, check the box for "On Behalf Of Request" and follow the instructions.

Enter CHOP user first name or last name and choose the user from the pop-up menu. If you need to add other users, please click the x icon to remove the name typed and type another user first or last name then choose the new user to add to the list – as per the screenshot below. This applies for both sudo/admin or readOnly Users depending on the access type


Step 9
Please follow by leaving a comment to the Virtual machine owner

Step 10
Click "Submit" to finish
Related Application & Services
Please use this request to onboard a research costcenter activity.
Request Access to Virtual Machine Provisioning Account.